What Makes Me A Masterpiece

I have decided to do more art journaling this year. With continuing to decorate my planner and other things creative, I also want to do more sharing this year and really just put my creative journey on full display. But today I want to share with you all my first art journal page of 2018.

The first step in creating this art journal page is I took a sheet of black cardstock and decided to do some zentangles with my white Sakura Gelly Roll pen.

Upon opening my art journal I found this background I did a while ago and decided (after adding some stamping to the right side) it would work for what I was trying to do.

Next, I pieced all my elements together…a digital tag from JLBCreativeCo. on Etsy that I colored over the weekend, some Jane Davenport Rub-Ons, a paint sample and a photo of my daughters dance team. Once everything was glued down it was time to add my journaling.

I felt like a quote about positive body images would go great with this photo so I went to Pinterest and found this quote by Kelsey Silver that was perfect!

Lastly, I added my own personal journaling to complete the layout. I love the way it all came together and I’m looking forward to continuing to share this creative process with you all.

Until next time,

Happy Crafting!

Nati J.

James Weekend!

Hello, hello, hello!!!!!

I hope everyone is doing well and enjoying this cooler weather. Recently, I purchased two of the James Burke’s stamp sets, Unbothered and Decora from his Etsy shop.

Over the past year, I have become a fan of James and his art. He’s like that one guy friend that you can literally talk to for hours and never get tired. I watch his YouTube videos every chance I get….like I have literally laughed out loud while watching his videos and have found myself talking to the screen. LOL. I’m not crazy – seriously! Anyway, I have really been inspired and have learned a lot! And I am excited to share with you all the stamps I purchased.

Here we have Unbothered on the left and Decora on the right.

Here are each of the ladies stamped with Onyx Black VersaFine ink and on the right with London Fog Memento Ink. Can you say, “LOOOOOOOVE!!!!”?

After stamping each lady and using some of the head Decora, I decided to play a little. And this is what I created.

The Unicorn Squad! Which when my youngest daughter saw the first girl, she herself had to join in on the fun.

And an “Unbothered” Pocket Letter that I will be sending out on Monday. I figured these ladies could be colored and used for ANY craft project, planner layout, card or mixed media piece…and of course each pocket is loaded with goodies on the back side.

This evening my oldest decided to join in on the fun as well.

They both love the Unicorn Girl!

And then here is the last one I did this evening.

I have really enjoyed playing with this stamp set and I’m looking forward to creating more with these stamp sets.

If you get a chance and haven’t already, you can find James on YouTube or in his Etsy Shop. He is also on social media. And NO, I’m not getting paid for this post, I’m just a fan!

Until next time, Happy Crafting ,

Nati

Chic Planning: Planner Girl – September 4-10, 2017

Hello, Hello, Hello!!!!!

Today I’ll be sharing with you all my planner layout for this week. I had so much fun creating it. So let’s get started!!!

My source of inspiration for this week came from The Paper Studio The Pink Passport paper pack from Hobby Lobby!!!! These scrapbook paper designs are so beautiful! The actual paper itself is thinner than I would like personally, but again, the designs are beautiful and can easily be added to any of planner layout, scrapbook layout or card.

So yes, this is where I gained the inspiration for my planner layout this week.

Here is the original design in the paper pack next to the one I altered.

I knew I wanted to add some color to my girl, so after cutting her out, I decided to use my Copic Markers to add some skin tones as well as add some additional color to the flower in her hair, lips and for the frames of her glasses. To complete the look, I added some Glossy Accents to her glasses.

While waiting for the glossy Accents to dry, I added some Paper Studio Washi Tape to my planner and then glued my girl down on the left side panel.

After looking it all over, it was time to add some stamps from The Sassy Clubto my layout to complete the look.

Here is the left side of my layout, followed by the

right side of my layout.

Here is the completed look of my layout. I ended up adding some scrapbooking/paper chalk to some of the edges around the boxes as well as to the calendar at the top of the left side of the page. I may go back and color in Darla and the other stamped images on the layout. But for now, that’s it.

Join me tomorrow as I give a tutorial on how I made the reversible paper clip in the top right corner of the layout.

Until next time, Happy Planning!

Nati J.

Stamp Set Review

Happy Tuesday Everyone!!!!!

I hope everyone is enjoying this Fall weather so far!   Today I wanted to share with you all my newest stamp set. I pre-ordered it last month from Sandra Amelia and it came in just in time for me to do my Planner Layout for last week. So let’s take a look at this stamp set:  

  Above is the stamp set from Sandra Amelia. I love everything about this stamp set!  I love how on each little image she has added faces to them. I also like how you can customize the book, planner and “currently” rectangle. And the diamond, I mean, what girl doesn’t need a diamonds stamp in her life?!?

Here are the inks I used to stamp the images.

  
To get comfortable with a stamp set, I like to ink them up using various inks. As seen above, I used VersaMagic, Versafine and Memento. When stamping the images, I liked Versafine the most as it seemed to give a more clear and precise image. 

Up close view of the stamps inked onto 110 lb cardstock.

  Upclose view is pictured above. 

Stamps and Copic Markers that were used to color in the stamps.

  
I can’t say enough how much I enjoyed working with this stamp set. I like how much effort Sandra put into making sure you are able to customize the set to your liking. 

Stamp set up close with color added to some

 Overall, I give this stamp set two thumbs up. I love how you can use it for not only your planner, but also for Project Life or any other Scrapbooking and/or card making project. Also, I noticed that none of my stamps stained which is also amazing, that speaks volumes to the quality of the stamps!!!! Please click here to check out more of the stamp sets Sandra Amelia has to offer. 

Until next time, Happy Crafting!

Nati J. 

ICAD Days 9-12

Hello Everyone! 
I hope that the summer break is treating you all well so far.  As for me, I just dropped my little beauties off with the grandparents for the next month.  So what does that mean…..a lot of deep cleaning over the next week, followed with a lot of rest and relaxation with the hubby the last 3 weeks….plus some craft time too of course!  🙂 
But enough of that, let’s get to these ICADs! These are the ICADs I made over June 9th – June 12th, while having a little fun with my watercolors.  So here we go. 

image

Day 9: No matter how hard, there is always “Freedom in letting go.”  Freedom of letting go of certain relationships and/or certain habits. Just let it go. 

image

Day 10: A little watercolor, mixed with some stamping and a fitting quote by Former President, Franklin D. Roosevelt. “A nation that destroys its soil destroys itself.  Forests are the lungs of our land, purifying the air and giving strength to our people.”

image

Day 11:  I really had fun with this card.  I love my Blessed Beyond Measure stamp and was happy to be able to use it in this capacity.  It was also my FIRST time drawing with watercolors….so I think with that being said, I think my heart came out pretty good! 

image

Day 12:  I had so much fun making this card.  I love the colors so much.  I didn’t feel the need to add a quote on this one,  because the girls that are stamped on the bottom just add to the whole look and feel of the card.   Happy~Love~Fun~Joy!

I hope you all enjoyed these ICADs. I will be posting yesterday’s as well as today’s,  tomorrow, so stop back by and check those out.  I promise you won’t be disappointed!  🙂  Until then, 

Happy Crafting,
Nati J.

Mixed Media Monday: Love 2

Hello, hello, hello! I thought I would bring you all another Mixed Media Project in the name of Love seeing as how this upcoming Saturday is the day of Love….Valentine’s Day!!!

Well, let’s get to it!

I must say off the bat that this Mixed Media Project was a very quick one. About 3 weeks ago, I saw a technique video on Instagram, that was a repost. The original post was made by a woman name Jeanean. She had this awesome video (click here) making what you see below.

IMG_2120
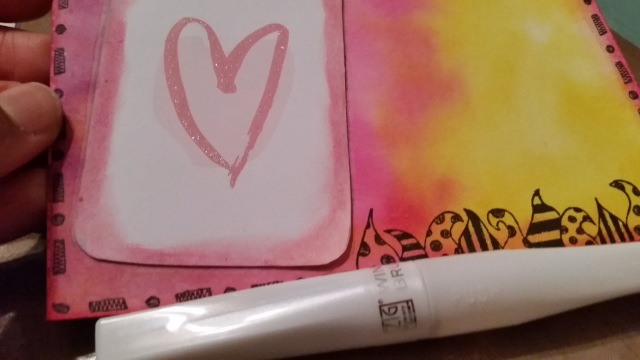
Long story short, Jeanean used Distress Ink along with water to create a beautiful, quick and easy watercolor technique. I used this technique for the background of my 4×6 card.

IMG_2119
After creating my background, I gathered some supplies to add to my 4×6 card.

IMG_2118
Ranger Archival Ink (Jet Black)
Faber-Castell Gelattos – Watermelon
Dylusions Clear Stamp Set : Clearly Borders By Dyan Reaveley
Project Life 3×4 Journaling Card – Heidi Swapp Dreamy Edition Kit

IMG_2117
Here, I just began to create a border using the Dylusions Clear Stamp Set, after adding the journaling card.

IMG_2116
To finish up the card, I decided to add hints of glitter using my Wink of Stella Glitter Pen in Clear.

DSCF9073
This was a very quick and easy 4×6 card to make. I believe it could be used as a journaling card, a card front, or even a Project Life card. I will be using mine as a Project Life card. It will be my Week Opener Card, for Week 6 (Valentine’s Week). I’m sure this card can be used for many other purposes on scrapbook pages, as a postcard, or even as a single panel thank you note, the possibilities are endless.

Happy Scrappin’
Nati J.

Technique Day: Tissue Paper Stamping

The first time I saw this technique was back in Summer 2008, during a Two Peas In The Bucket Online Course called Thinking Inking lead by Jennifer McGuire. In this particular class, she stamped an image onto tissue paper to get a more precise image and then applied the tissue paper to a sticky back canvas.
With that being said, I would like to share this super easy technique with you all….minus the canvas.

First, gather your materials:
Any type of stamp (here, I used Ranger MEDIA Clear Stamp Set, Clearly Collaged Hearts by Dina Wakley)
An Acrylic Block (Optional)
Ranger Archival Ink – Jet Black
Tissue Paper (I subscribe to Julep and every month the nail polish and beauty products are wrapped in tissue paper and shredded paper) They always have nice tissue paper and this is a great way to recycle the tissue paper.

2015/01/img_2045.jpg

Next, ink the stamp you will be using with the Archival Ink. The great thing about this ink is that not only is it Acid Free, but it’s also Fade Resistant, and Waterproof. The fact that it is waterproof makes it a great ink to use with mixed media projects.

2015/01/img_2046.jpg

Press your stamp down onto the tissue paper.

2015/01/img_2044.jpg

Here below, after stamping the image you will get a nice crisp image.

2015/01/img_2047.jpg

Here are some of the other stamps from the stamp set on some of the other tissue papers.

2015/01/img_2048.jpg

The really cool thing about this is that once you have stamped your image, the limits are truly infinate. I cut my stamped tissue paper hearts out and used them in a Mixed Media project (which I will be sharing on Monday).

So please give this technique a try and let me know how you like it and what kind of projects you made with them.

Until next time, Happy Scrappin’!
Nati J.

Here is a Sneak Peak of Monday’s Blog Post showcasing these too cute embellishments 🙂

2015/01/img_2050.jpg